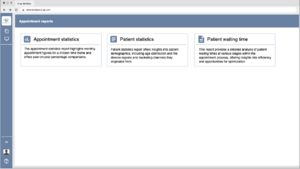
The Overview Reports Page is designed to provide users with a concise and visually appealing view of available reports. Each report will be represented by a card containing essential information, such as an icon representing the report type, the report's name, and a brief summary. Users can easily navigate through the reports by clicking on a specific card, which will open the chosen report along with its detailed contents.
Header Navigation:
A consistent header at the top of the page with application name
Report Cards:
A grid layout of report cards, each presenting a report's essential details.
Each card consists of:
An icon representing the report type (e.g., a graph icon for statistical reports, a document icon for textual reports).
The name of the report (e.g., "Monthly Appointment Statistics Report").
A brief summary (1-2 sentences) highlighting the report's key findings.
A clickable area covering the entire card, making it easy for users to select a report.
Functionality:
Each report card is interactive, responding to user's click.
When a user clicks on a report card, the system will navigate to the detailed view of the chosen report
Appointment statistics report - details
The Report Page is designed to display the selected report's details and offer users the ability to interact with report inputs, download the report, save it as a template, and manage saved templates. The page includes a left sidebar featuring the report name and two tabs: "Report Inputs" and "Saved Templates."
Page Layout
Left Sidebar:
Positioned on the left side of the page.
Contains the header displaying the name of the current report.
Includes two tabs:
"Report Inputs": For configuring the report parameters.
"Saved Templates": For managing saved report templates.
Download Report Button:
Located at the bottom of the "Report Inputs" section.
Clicking this button generates the report based on the configured inputs and initiates a download of the report file (always Excel).
Save as a Template Button:
Positioned below the "Download Report" button.
Allows users to save the current input configuration as a template for future use.
Report inputs
Name, mandatory, free text -Allows users to enter the name to be included in the report.
Date Picker (Years Only, From-To):
Enables users to select a range of years.
Checkbox, current year, if selected To field is disabled
Appointment Types Search Bar with "+" Functionality:
Users can search and select appointment types from a predefined list.
+ button allows users to include selected appointment types in the report or by clicking on it
Added Appointment Types Display:
The selected appointment types are displayed as cards in a draggable list.
Each card should clearly display the selected appointment type along with the "X" button for removal.
Checkboxes, if any of the following are selected it will show in the report, user can choose multiple inputs
Show Statistics per Appointment Variant, If the "Show Statistics per Appointment Variant" checkbox is selected, a new sheet is added to the XLS report.
Include Cancelled Appointments, depending on the checkbox selections, new rows are added to the XLS report.
Include No-show Appointments, depending on the checkbox selections, new rows are added to the XLS report.
Include Deactivated Types and Variants, depending on the checkbox selections, new rows are added to the XLS report.
Saved templates
Saved templates list:
Displays a list of saved report templates.
Each entry includes the template name and potentially a preview of the configured inputs.
Users can click on an entry to load and edit the template.
Update template button allows user to update any changes made to chosen report
Delete template button deletes selected template
Report Data Inputs Section
Contains input controls for configuring report parameters, similar to the Report Inputs Page.
Allows users to customize the report by adjusting input values.
Scheduling and sending section
Includes options for scheduling the report sending and adding recipients.
Enables users to toggle scheduling for report sending.
When enabled, additional options for scheduling become available.
Each added email is displayed as a tag with an "X" button for removal.
Users can select from various recurrency options: weekly, monthly, yearly, or none with specific time for the scheduled report to be sent.
Functionality
Input Validation
Implement validation to ensure mandatory fields are filled
Implement validation to ensure that date ranges are logical
Implement validation that entered emails are in a proper email format before adding them.
If user enters any input and tries to exit the page add a popup "You have unsaved work on this page. Leaving now will result in the loss of your changes. Are you sure you want to leave without saving? Yes/No"